

3. Joining
Joining one of my Zoom meetings usually starts with a very simple, quick and easy registration process. I’ll provide you with a Registration url and you’ll just need to put in your first and last name and email. Watch out: you need to scroll down to the bottom of the registration page to complete the registration and receive a unique link to join the session. I never share your Zoom information with any third party. By registering for any of my sessions, whether a free public session or part of the PaintboxTV membership, you are giving permission to be recorded during the session and for me to keep you informed by email of related matters such as subsequent sessions. My meetings are often recorded for educational purposes and many of the recordings are posted on PaintboxTV. When you register you automatically receive a unique url link (sent via confirmation email) to use to join the meeting itself. These unique links incorporate the meeting password which Zoom now automatically includes for every meeting. By using your unique link you don’t have to paste in a password. Keep your confirmation email handy so you can reuse the link for subsequent meetings in the series (e.g. Zoom-at-Noon Drawing Boards or Portrait Conversations).
When you click on that link you may have the option of joining via the Zoom app (choose “Open zoom.us.app” -it is recommended) or via your web browser (less options within the meeting). When you first install the Zoom app choose “Allow” to permitting the app to access your device camera and microphone. Once you are in a meeting your video and audio can be unmuted or muted by clicking on the microphone and video symbols (in the bottom left on the Mac or PC or in the top right on the iPad) unless I have disabled that ability.
Here is an example of what you may see as you join a meeting.

Before you enter a meeting you may see a video preview window and be offered the choice whether you wish to join the meeting with or without video. If you choose without video you may be represented by your name against a dark gray rectangle.
Audio Settings
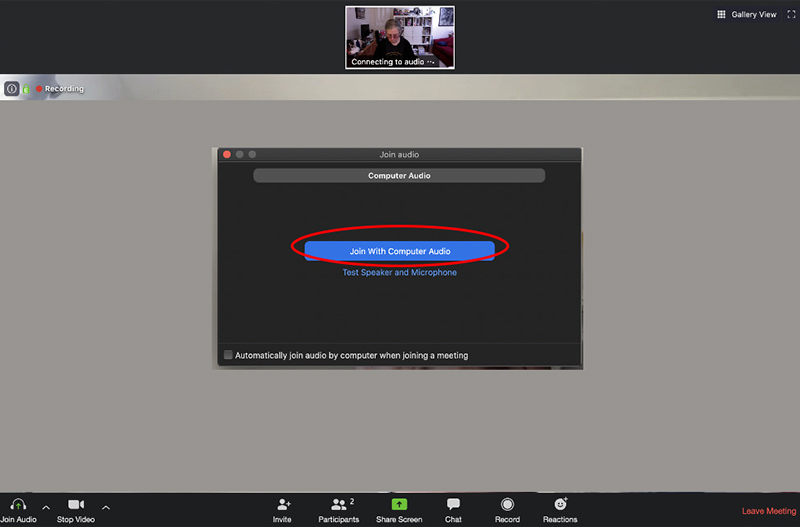
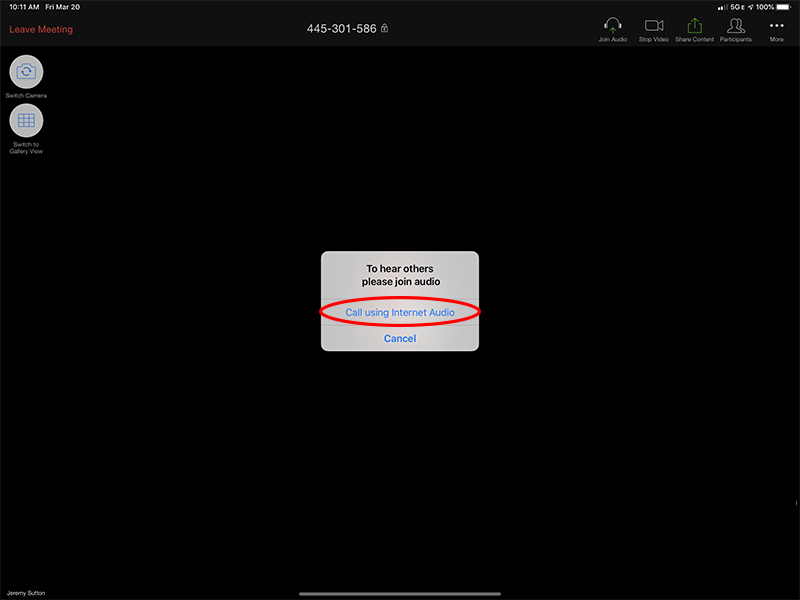
When you join a meeting you’ll be asked to choose your audio option. This is referring the option for hearing what is said in the meeting. Choose “Join with Computer Audio” or the equivalent. On a device like an iPad you may see the device audio choice described, rather confusingly, as “Call using Internet Audio”.
Generally I start meetings with the attendees audio muted as they arrive. It’s always a good idea to double check when you join a meeting whether your microphone or video are on or muted. The symbols have a slash through them or are greyed out if muted. If you are unmuted and have a loud sound going on, such as a barking dog or a phone ringing or child screaming, please immediately mute yourself (by clicking on the microphone symbol) out of courtesy to everyone else.
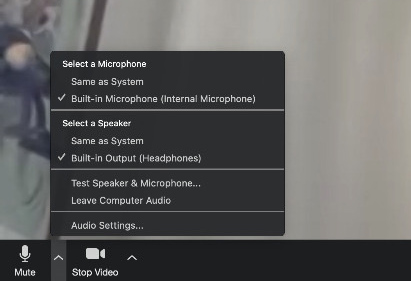
Mac or PC audio and video settings icons are in the bottom toolbar on the left (tap on chevrons to see pop-up menus). On the iPad the audio and video settings icons are in the top right. If you don’t see any settings icons at all just tap your cursor in the Zoom window and they will magically appear! By clicking on the upward chevron to the right of the microphone symbol (Mac/PC) you can access the audio settings and adjust both your speaker and microphone settings.
After joining a meeting, setting up your audio settings and making sure you’re aware of whether your audio and video are muted or not, you should see and hear the presenter. If you do not, please type in the Chat that you can’t see or hear the presenter. Sometimes they may not be aware they they have accidentally muted themselves! Do not assume that the issue is at your end:-)